






A detailed archaeological guide across the East and West Banks of ancient Thebes (Waset): Karnak and Luxor Temples, the Avenue of Sphinxes, the Valley of the Kings, and Deir el-Medina.
New Kingdom Waset: Solar Temples on the Nile and Hidden Tombs Beneath Al-Qurn
Known to the ancient Egyptians as Waset and to Homer as Hundred-Gated Thebes, modern Luxor rose to pre-eminence during the Middle Kingdom and reached its golden age as the imperial capital of the New Kingdom (1550, 1070 BC) under the Eighteenth, Nineteenth, and Twentieth Dynasties. Divided by the Nile according to solar cosmology, the East Bank housed the living city and the monumental cult temples of Amun-Ra, Mut, and Khonsu at Karnak and Luxor linked by a 2.7-kilometre Avenue of Sphinxes.
Across the river beneath the natural pyramid peak of Al-Qurn on the West Bank lay the realm of the dead, where pharaohs from Thutmose I and Hatshepsut to Tutankhamun, Seti I, and Ramesses II carved hidden royal tombs in the Valley of the Kings and raised Millions-of-Years mortuary temples along the edge of the desert.
Karnak Temple Complex & Precinct of Amun-Ra
Ram-Headed Sphinx Avenue, First Pylon of Karnak, Great Court, Great Hypostyle Hall 134 Columns, Obelisks of Hatshepsut and Thutmose I, Festival Temple of Thutmose III, Sacred Lake Scarab, Open-Air Museum White Chapel, Precinct of Khonsu, and Precinct of Mut
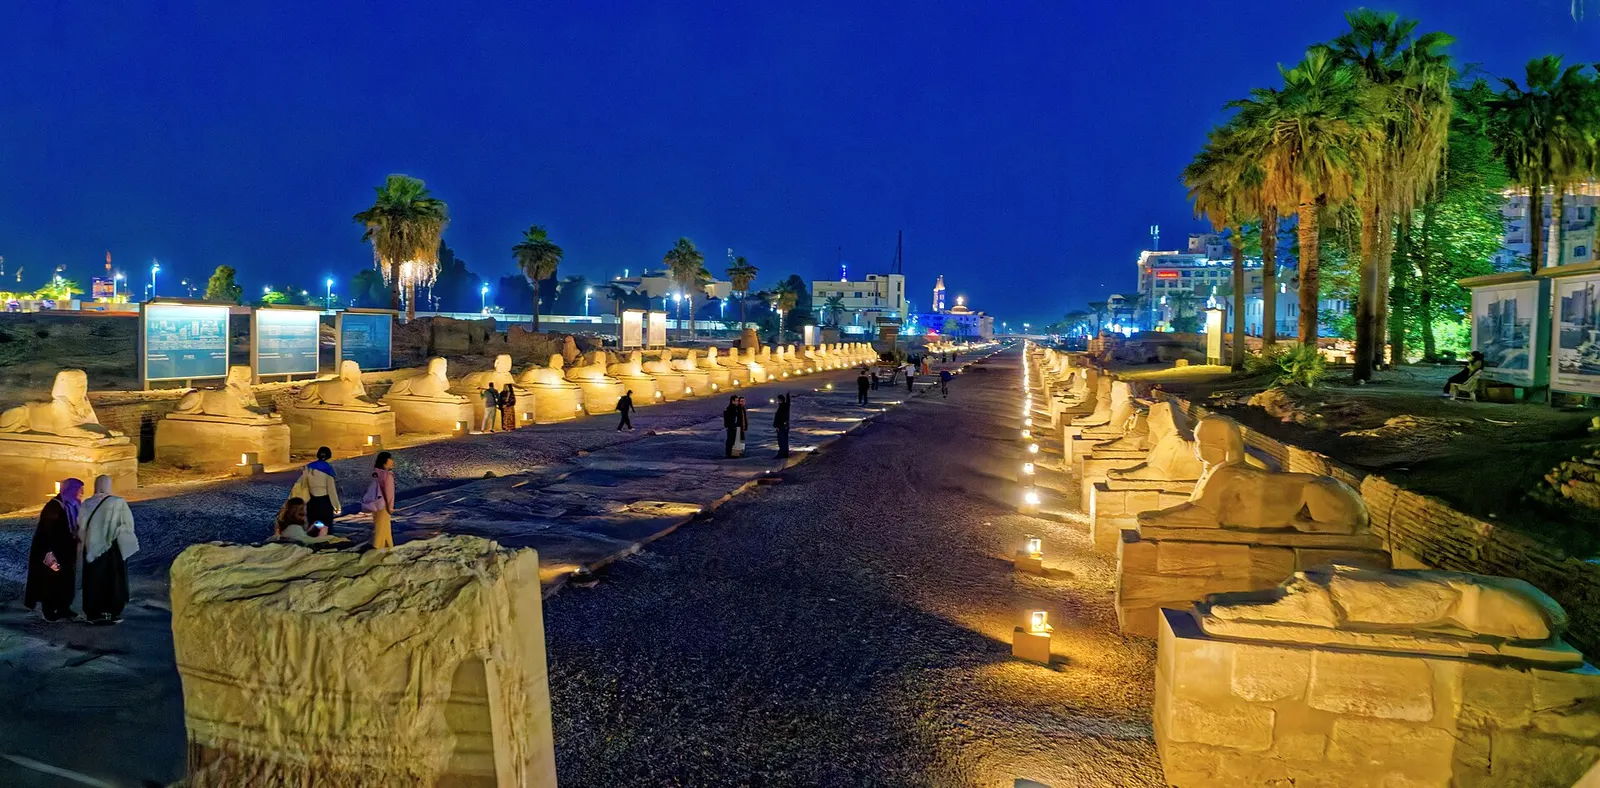
Avenue of Ram-Headed Sphinxes
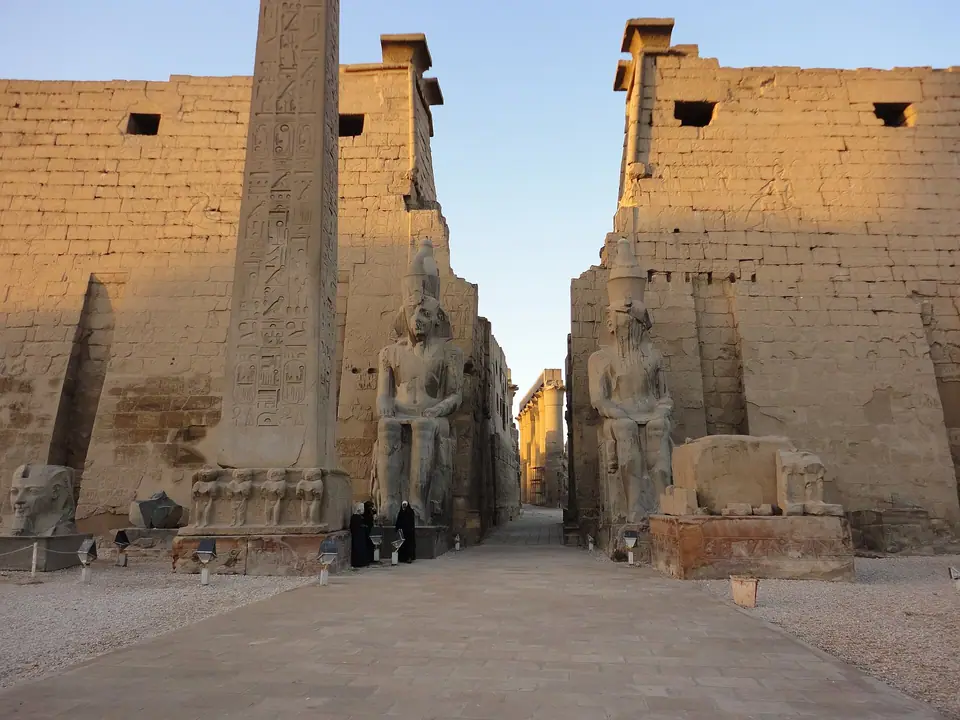
Commissioned during the New Kingdom, this ceremonial causeway once connected Karnak with Luxor Temple. Each sandstone sphinx holds a small statue of Ramesses II between its forepaws, symbolising royal protection under the god Amun. Travellers can observe intact hieroglyphic inscriptions carved into the plinths along the western approach.
First Pylon of Karnak
Constructed during the Thirtieth Dynasty under Nectanebo I, this colossal stone entrance remains unfinished. The sheer mass of the pylon reveals ancient construction methods, including the remnants of interior mudbrick ramps. From the top of the terrace, visitors can appreciate the axial layout spanning the entire Precinct of Amun-Ra.
Great Forecourt
Spanning over eight thousand square metres, this court was added during the Twenty-Second Dynasty to enclose earlier freestanding structures. The court contains the triple shrine of Seti II and the kiosk of the Nubian pharaoh Taharqa. Visitors will note the single standing papyrus column that remains from Taharqa's once towering colonnade.
Shrine of Seti II
Built from fine sandstone in the northwest corner of the Great Forecourt, this shrine houses three parallel chambers for the divine boats of Amun, Mut, and Khonsu. Relief carvings depict Seti II presenting offerings and anointing the sacred images. The architectural details show delicate preservation of the lower registers and lintels.
Colossus of Pinedjem I
Originally carved for Ramesses II, this monumental pink granite figure was later usurped and reinscribed by the High Priest Pinedjem I. The pharaoh stands in a traditional striding pose with a smaller queen figure positioned beside his legs. Notice the delicate preservation of the royal nemes headdress and pleated kilt.
Temple of Ramesses III
This self-contained structure features its own pylon, an open peristyle court flanked by Osiride pillars, and a hypostyle hall leading to three chapels. Detailed bas-reliefs on the exterior walls depict the pharaoh's military campaigns against the Sea Peoples. Inside, visitors can study historic painted details protected from weather beneath the roof blocks.
Second Pylon of Karnak
Initiated by Horemheb and completed by Ramesses II, this massive gateway leads directly into the Great Hypostyle Hall. Excavations revealed thousands of decorated sandstone talatat blocks inside the core, taken from Akhenaten's demolished sun temples. Colossal granite statues of Ramesses II flank the entrance, partially restored by modern conservators.
Great Hypostyle Hall
Erected during the Nineteenth Dynasty under Seti I and Ramesses II, this hall represents one of ancient Egypt's supreme architectural feats. Twelve central columns with open papyrus capitals reach a height of twenty-one metres, supported by clearstorey stone grilles that filtered sunlight. The walls display bas-reliefs of coronation rituals and battle sequences.
Third Pylon of Karnak
Amenhotep III dismantled several earlier structures to form the core of this gateway, inadvertently preserving historic monuments for modern archaeologists. The central portal once carried gilded bronze doors, as recorded in royal annals. Today, travellers walk through the ruined pylon to reach the central court where the obelisks rise.
Obelisk of Thutmose I
Standing nearly twenty-two metres tall between the Third and Fourth Pylons, this monolithic spire was quarried from the granite beds of Aswan. Carved with vertical lines of hieroglyphs, it marks the original processional axis of the early New Kingdom temple. The inscriptions record the pharaoh's devotion to Amun-Ra and celebrate royal jubilees.
Obelisk of Hatshepsut
Reaching a height of nearly thirty metres, this monlith is the tallest standing obelisk in Egypt. It was cut from single-piece Aswan granite and transported by river barge before being raised between the Fourth and Fifth Pylons. Hieroglyphic inscriptions around the base recount its extraction and dedication within seven months of quarrying.
Sanctuary of the Sacred Barque
Erected under Philip Arrhidaeus, the half-brother of Alexander the Great, this sanctuary replaced an earlier shrine built by Thutmose III. The polished pink granite walls depict Philip receiving crowns and offering incense to Amun-Ra in traditional pharaonic dress. The interior room held the gilded ceremonial boat during sacred festivals.
Middle Kingdom Court
Positioned eastward along the primary axis, this open expanse represents the founding location of the temple dating back to the Eleventh and Twelfth Dynasties. Little remains beyond the alabaster pavement blocks and granite thresholds laid down by Senusret I. It provides key archaeological context for Karnak's organic outwards expansion.
Festival Hall of Thutmose III
Named the Akh-menu, or Splendour of Monuments, this complex served as a jubilee celebration hall for Thutmose III. Its central hall is supported by thirty-two pillars and twenty painted columns designed to resemble inverted ceremonial tent supports. In an adjoining chamber lies the famous Botanical Garden relief series depicting exotic Syrian flora.
Sacred Lake of Amun
Excavated during the reign of Thutmose III, this rectangular pool measures one hundred and twenty metres by seventy-seven metres. Priests cleansed themselves in its water four times daily before conducting ceremonies in the adjacent inner sanctuaries. Stone stairs descend to the waterline, alongside ancient retaining walls built from dressed sandstone.
Great Scarab Monument
Commissioned by Amenhotep III, this massive pink granite carving sits on a raised pedestal overlooking the northwestern corner of the Sacred Lake. The beetle represents Khepri, the manifestation of the morning sun and symbol of rebirth. Local tradition holds that walking around the plinth brings fortune, making it a focal point for travellers.
White Chapel of Senusret I
Crafted from fine white crystalline limestone, this delicate pavilion was built for the pharaoh's Sed festival before being dismantled for Third Pylon fill. Reconstructed inside the Open-Air Museum, the chapel contains some of Egypt's finest low-relief carvings. The base registers display a valuable geographic list of ancient Egyptian administrative nomes.
Red Chapel of Hatshepsut
Constructed as a barque repository by Queen Hatshepsut and Thutmose III, this chapel was later taken apart by Amenhotep III. French archaeologists reassembled the monument using hundreds of numbered blocks retrieved from the Third Pylon. The colourful walls present rare depictions of the queen performing sacred rites alongside her co-regent.
Temple of Khonsu
Located in the southwest sector of the precinct, this well-preserved temple was founded by Ramesses III and decorated by subsequent rulers. It exhibits classical Egyptian architectural progression, moving from a front pylon and peristyle court into a hypostyle hall and inner sanctuary. The ceilings retain vivid astronomical scenes with blue and yellow pigments.
Precinct of Mut
Connected to the main Amun precinct by a paved avenue of ram sphinxes, this complex centres on the temple of Amun's consort, Mut. Surrounding the crescent-shaped sacred lake known as the Isheru, the site preserves dozens of seated diorite statues of the lioness-headed goddess Sekhmet. The ruins include secondary chapels dedicated to Ramesses III and Ptolemaic rulers.

Avenue of Sphinxes, Luxor Temple & East Bank Museums
2.7 km Avenue of Sphinxes Kebash Road, Luxor Temple First Pylon & Ramesses II Colossi, Abu Haggag Mosque inside Luxor Temple, Colonnade of Amenhotep III, Solar Court, Alexander the Great Sanctuary, Luxor Museum, Mummification Museum, and Winter Palace Gardens
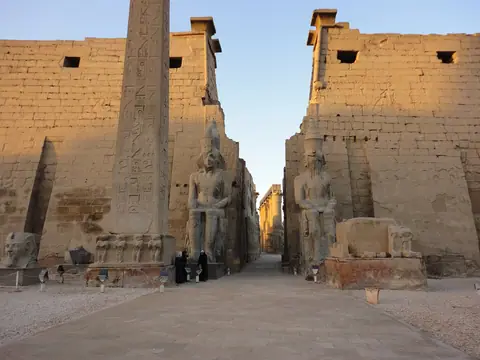
First Pylon of Luxor Temple
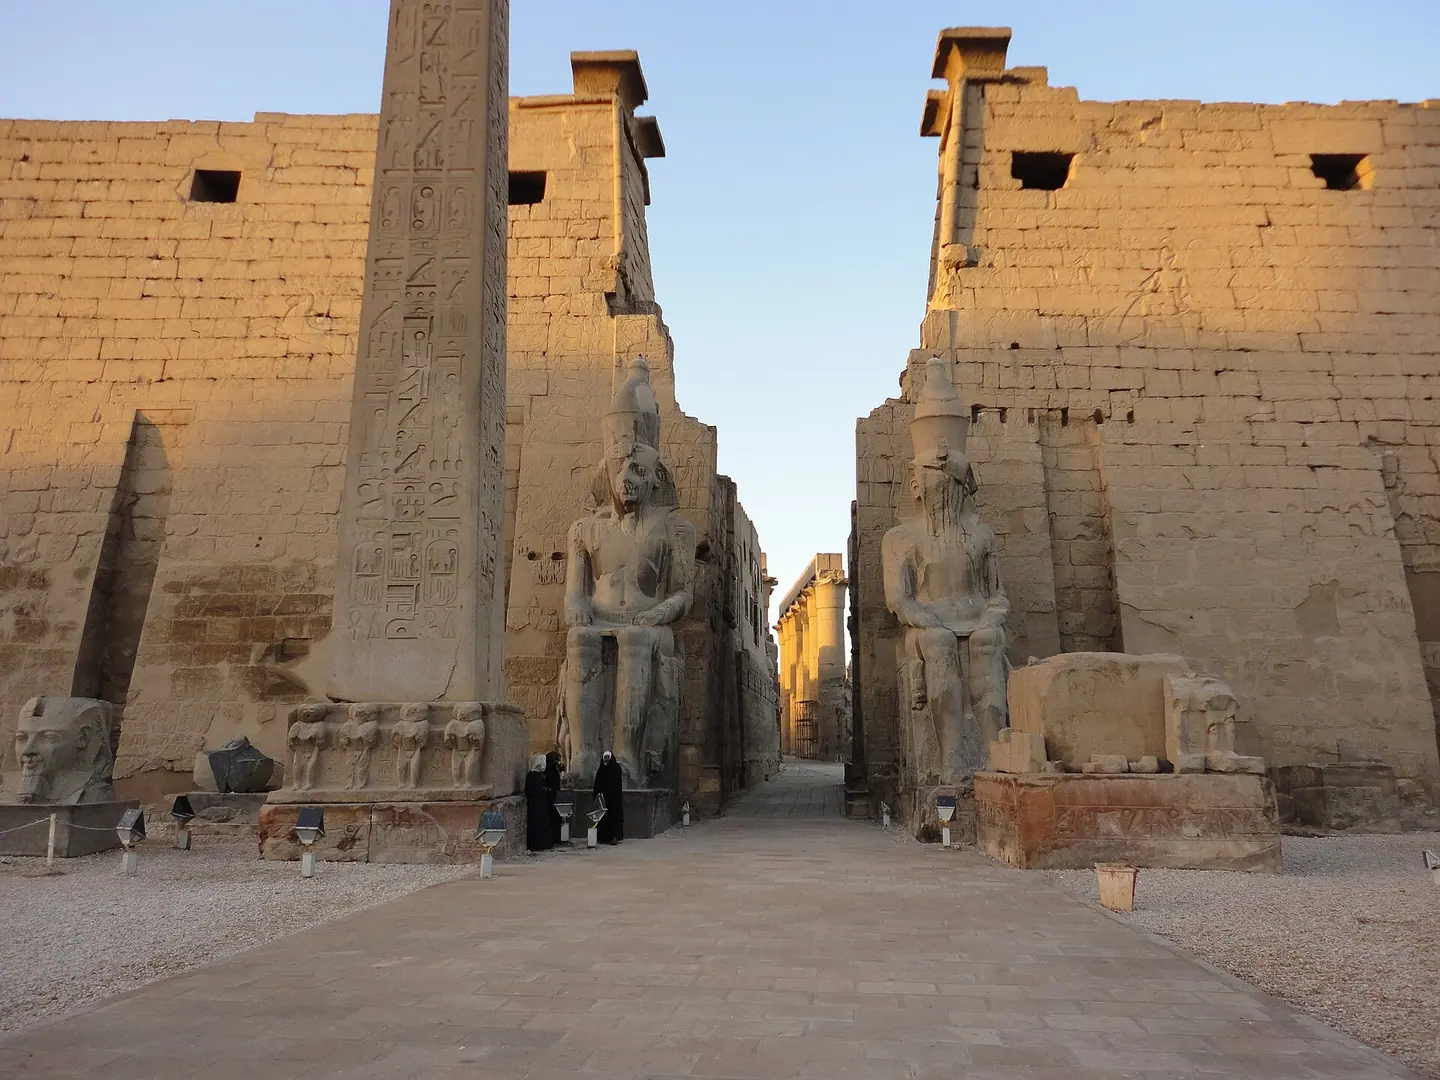
Ramesses II constructed this massive entry facade to celebrate his military campaigns against the Hittites. Carvings depict the famous Battle of Kadesh across the sandstone blocks, originally fronted by six seated and standing royal colossi. A solitary pink granite obelisk still towers beside the grand entrance portal.
Colossal Statues of Ramesses II
Flanking the entry portal of Luxor Temple, these colossal seated sculptures represent Ramesses II wearing the double crown of Upper and Lower Egypt. Carved from dark grey granite and pink granodiorite, the statues feature smaller carvings of Queen Nefertari beside the pharaoh's legs. Restorers have recently re-erected several standing companion statues.
Granite Obelisk of Ramesses II
This twenty-five-metre monolith stands proudly to the left of the pylon, carved from single blocks of Aswan granite. Its missing twin was gifted to France in the 1830s and now stands at the Place de la Concorde in Paris. Deeply incised hieroglyphs along its faces praise the pharaoh's piety and eternal rule.
Mosque of Abu Haggag
Built during the Ayyubid era atop centuries of accumulated silt, this active mosque sits directly over the northeastern columns of Luxor Temple. Its elevated entrance illustrates how deeply buried the pharaonic monument once was before modern clearance. Inside, traditional Islamic arches and a distinctive minaret integrate seamlessly with ancient lotus-bud capitals.
Peristyle Courtyard of Ramesses II
This expansive court contains seventy-four papyrus-bundle columns arranged around a central space skewed to align with the processional avenue to Karnak. Colossal standing statues of Ramesses II occupy the intervals between the front pillars. In the northwest corner stands an intact granite shrine dedicated to the Theban Triad by Queen Hatshepsut.
Colonnade of Amenhotep III
Fourteen massive sandstone columns, standing sixteen metres tall, form this grand processional passage initiated by Amenhotep III and decorated by Tutankhamun. The open-calyx capitals once supported a stone roof above the central processional nave. Reliefs along the enclosing walls depict the joyous festivities of the annual Opet Festival, including musicians and dancing acrobats.
Solar Court of Amenhotep III
Measuring around forty-five metres in length, this sunlit court is surrounded on three sides by double rows of closed-bud papyrus columns. The proportions illustrate the refined architectural taste of the Eighteenth Dynasty at its artistic peak. In 1989, conservators working beneath the paved floor discovered a buried cache of pristine pharaonic statues.
Hypostyle Hall of Luxor Temple
Featuring thirty-two bundle columns arranged in four rows of eight, this hall served as the formal vestibule to the temple's most sacred rooms. Intricate carvings depict Amenhotep III offering incense, fresh flowers, and sacred oils to the Theban deities. The surviving stone architraves display preserved polychrome pigment on their protected undersides.
Roman Imperial Cult Chamber
During the third century, Roman legionaries converted this central pharaonic antechamber into a military chapel dedicated to the Tetrarchy. Plaster was applied over the original Egyptian reliefs to create historic frescoes depicting Roman emperors in classical dress. Modern conservation has revealed both the underlying hieroglyphs and the classical Roman decorative scheme side by side.
Sanctuary of Alexander the Great
Situated behind the Roman antechamber, this chamber was rebuilt by Alexander the Great to legitimise his divine authority in Egypt. Wall reliefs show the Macedonian king dressed in traditional pharaonic vestments offering sacrifice before Amun-Ra. The central chamber once held the sacred golden barque used during the ceremonial river crossing from Karnak.
Birth Room of Amenhotep III
This intimate inner room features detailed reliefs illustrating the divine conception and birth of Amenhotep III. The god Amun is shown taking the form of the king's father, with the ram-headed creator god Khnum fashioning the child upon a potter's wheel. These visual declarations reinforced the divine legitimacy of the Eighteenth Dynasty ruler.
Avenue of Sphinxes Southern Terminus
The southern end of the processional dromos begins immediately north of the First Pylon, flanked by rows of sandstone human-headed sphinxes. Nectanebo I restored and expanded this section, replacing earlier New Kingdom structures with finely carved figures resting on plinths. This paved corridor served as the festive pathway during the sacred Opet celebrations.
Avenue of Sphinxes Kebash Road
Stretching almost three kilometres across modern Luxor, this monumental avenue connected the temples of Karnak and Luxor in antiquity. Extensive archaeological excavations uncovered over a thousand sphinxes, ancient Nilometers, and Roman wine presses alongside the paved pathway. It reopened fully to pedestrians after decades of careful clearance and stone restoration.
Statue of Amenhotep III and Sobek
Housed within the Luxor Museum, this polished calcite group statue was discovered at Dahamsha in 1967. It shows Amenhotep III seated beside Sobek, the crocodile god of the Nile, who wears the elaborate horned sun crown. The smooth finish and translucency of the stone highlight the supreme skill of Eighteenth Dynasty sculptors.
Statue of Thutmose III
This sculpture portrays the warrior pharaoh Thutmose III wearing the royal Nemes headdress, carved from hard green schist or greywacke stone. Found in the Karnak Favissa, the statue remains famous for its gentle facial expression and smooth surfaces. It occupies a central position within the primary galleries of the Luxor Museum.
Luxor Museum Cachette Gallery
This specialised gallery exhibits the extraordinary collection of New Kingdom statues unearthed during courtyard excavations at Luxor Temple in 1989. The works were deliberately buried in antiquity to protect them from desecration, leaving their surfaces exceptionally well preserved. Among the highlights is an imposing pink quartzite standing figure of Amenhotep III.
Mummification Museum
Located along the Corniche du Nil, this subterranean museum explains the religious and technical aspects of ancient mummification. The collection displays surgical embalming tools, canopic jars, resin samples, and mummified remains of cats, baboons, fish, and crocodiles. Clear interpretive panels describe the ritual journey toward achieving eternal life in the underworld.
Sofitel Winter Palace Historic Gardens
Enclosing several hectares behind the historic 1886 palace hotel, these tranquil gardens feature century-old palms, bougainvillea, and rare subtropical trees. British colonial travellers and archaeologists, including Howard Carter, frequently strolled along these manicured gravel paths between excavation seasons. The grounds provide a quiet green retreat steps away from the historic Nile riverbank.
Luxor Roman Fort Wall Remains
Traces of third-century Roman mudbrick ramparts and defensive bastions survive immediately north and east of Luxor Temple. The Roman army converted the entire pharaonic complex into a castrum, the fortified headquarters of Legio III Diocletiana. Visitors can observe the distinct contrast between the towering pharaonic masonry and the late antique defensive brickwork.
Corniche du Nil East Bank Promenade
Stretching along the riverbank past Luxor Temple and the municipal museums, this waterfront promenade provides open views across to the Theban hills. Traditional feluccas and passenger ferries dock along the stone quays throughout the day. It offers a convenient pedestrian link connecting the central temple enclosure with the cultural collections further north.
Valley of the Kings & Deir el-Bahari Hatshepsut Temple
Colossi of Memnon, Valley of the Kings East Valley, Tomb of Tutankhamun KV62, Tomb of Seti I KV17, Tomb of Ramesses VI KV9, Tomb of Ramesses IV KV2, Tomb of Merenptah KV8, Carter House, and Mortuary Temple of Hatshepsut at Deir el-Bahari
Colossi of Memnon
These two massive stone statues represent Pharaoh Amenhotep III seated upon his throne, facing east toward the Nile. Carved from single blocks of quartzite sandstone, they once guarded the entrance to the monarch's ruined mortuary temple. Travellers should observe the Roman period graffiti and the eroded relief carvings of Hapi flanking the throne.
Mortuary Temple of Amenhotep III
Extending behind the Colossi of Memnon, this temple complex was once the largest religious centre on the West Bank before earthquakes destroyed it. Extensive excavations by the Colossi of Memnon and Amenhotep III Temple Conservation Project continue to reconstruct giant statues and columned courtyards. Visitors can examine fallen quartzite figures of the king and massive stelae.
Carter House and Replica Tomb
British archaeologist Howard Carter lived in this domed mudbrick house during his prolonged search for royal tombs in the nearby wadis. The interior contains his personal desk, photographic darkroom, and original surveying equipment alongside period furnishings. In the garden, an exact 3D laser replica reproduces the burial chamber of Tutankhamun to relieve visitor pressure.
Valley of the Kings East Valley
Cut into the limestone cliffs beneath the natural pyramid of al-Qurn, this desert valley served as the burial ground for Egyptian rulers across five centuries. More than sixty rock-cut tombs feature intricate corridors descending deep into the bedrock. We find painted wall reliefs detailing esoteric underworld texts including the Amduat and the Book of Gates.
Tomb of Tutankhamun KV62
Discovered largely intact by Howard Carter in 1922, this modest rock-cut tomb remains one of the most famous archaeological finds in history. The burial chamber still houses Tutankhamun's original gilded wooden shrine, stone sarcophagus, and linen-wrapped mummy. Colourful murals on the walls show the funeral procession and the king's reception by Osiris.
Tomb of Seti I KV17
Uncovered by Giovanni Belzoni in 1817, this deep subterranean sepulchre descends over one hundred metres into the rock. Every wall and ceiling displays raised plaster reliefs finished with vivid mineral pigments depicting complex cosmological scenes. Notable highlights include an astronomical ceiling map in the burial chamber and fine portraits of Hathor welcoming the sovereign.
Tomb of Ramesses VI KV9
Originally planned for Ramesses V and later expanded by Ramesses VI, this tomb features a straight sloping corridor with high ceilings. The plaster walls preserve nearly complete texts of the Book of Caverns, Book of Gates, and Book of the Earth. A double depiction of the sky goddess Nut stretches across the burial chamber ceiling.
Tomb of Ramesses IV KV2
Positioned near the valley entrance, this tomb features wide, shallow ramps engineered to facilitate the transport of royal burial furniture. The interior corridors present litanies to Re and scenes from the Book of the Dead in crisp paint. Inside the final chamber, travellers encounter an exceptionally large red granite sarcophagus carved with protective deities.
Tomb of Merenptah KV8
Constructed for the thirteenth son and eventual successor of Ramesses II, this tomb drops steeply through a sequence of pillared halls. While early sections suffered flood damage in antiquity, lower chambers display vivid reliefs of the Litany of Re. The vaulted burial chamber still contains the heavy lid of Merenptah's outer pink granite sarcophagus.
Tomb of Ramesses III KV11
This expansive subterranean complex was begun by Sethnakht and completed by Ramesses III with distinctive side suites. Small chambers flanking the upper corridor display uncommon everyday scenes, including royal kitchens, armour, and blind harpists performing before gods. Deep inside, the burial hall contains traditional mythological texts guiding the pharaoh through the dark hours of night.
Tomb of Horemheb KV57
Marking the transition from the Eighteenth to the Nineteenth Dynasty, this tomb introduced carved bas-reliefs in place of simple wall paintings. Several decorated walls remain unfinished, offering insight into ancient artisan grids and preliminary sketch methods in black ink. The stone sarcophagus in the burial chamber is carved with protective goddesses extending winged arms.
Tomb of Thutmose III KV34
Perched high in a southern ravine accessible by steep metal stairs, this Eighteenth Dynasty sepulchre features an oval, cartouche-shaped burial chamber. The yellow-washed plaster walls are covered with stick-figure sketches that mimic an unrolled papyrus scroll of the complete Amduat. A red quartzite sarcophagus carved with the goddess Nut rests on the bedrock floor.
Tomb of Amenhotep II KV35
Constructed with a deep protective well shaft, this tomb features a large pillared hall decorated with the complete Amduat text. When discovered by Victor Loret in 1898, it held not only the pharaoh in his sarcophagus but also a secret cache of sixteen other royal mummies. Visitors descend steep stairways to explore the painted six-pillared burial chamber.
Tomb of Ramesses I KV16
Due to the pharaoh's brief reign of under two years, this tomb consists of a steep staircase leading directly to a single burial chamber. The compact room features vivid paintings on grey-blue plaster backgrounds, depicting Ramesses I led by Anubis and Horus. In the centre sits a massive red granite sarcophagus painted with yellow hieroglyphic inscriptions.
Tomb of Siptah KV47
Carved into the south-western cliff, this elongated tomb extends over one hundred metres into the hillside through decorated corridors. Fine plaster bas-reliefs near the entrance depict the young pharaoh before Re-Horakhty alongside detailed scenes from the Litany of Re. A notable red granite sarcophagus box, carved with the figure of Osiris, rests in the burial chamber.
Tomb of Tausert and Setnakht KV14
This unusual tomb contains two full burial chambers, originally begun for Queen Tausert and later commandeered by King Setnakht. Extending across multiple corridors, it is one of the deepest excavations in the Valley of the Kings. Visitors can trace changes where feminine pronouns and royal figures were re-carved and plastered over to accommodate the subsequent king.
Mortuary Temple of Hatshepsut at Deir el-Bahari
Designed by the royal architect Senenmut, this limestone sanctuary rises in three grand colonnaded terraces connected by central ramps. The structure blends into the sheer cliffs of Deir el-Bahari behind it. On the middle terrace, fine coloured reliefs depict Hatshepsut's divine birth and her trading expedition to the distant land of Punt.
Chapel of Hathor at Deir el-Bahari
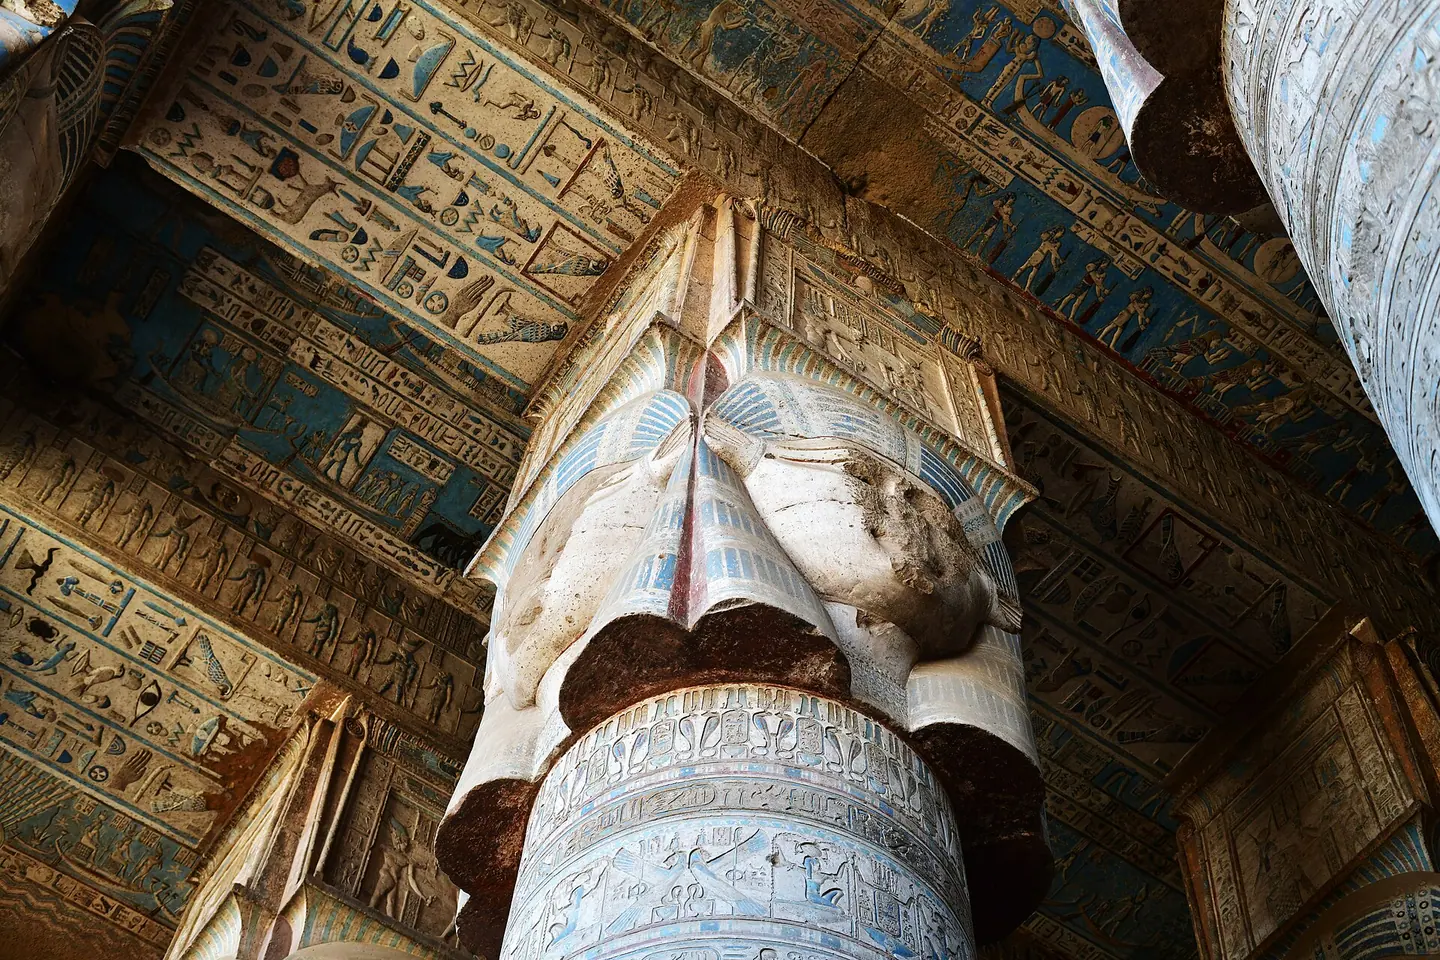
Located on the southern side of Hatshepsut's middle terrace, this dedicated shrine honours Hathor as the protector of the Theban necropolis. The outer hypostyle hall features columns topped with the dual-faced head of the cow goddess wearing a broad collar. Inner rock-cut chambers preserve bright paintings of Hathor licking the hand of the enthroned pharaoh.
Chapel of Anubis at Deir el-Bahari
Flanking the northern end of the middle colonnade, this well-preserved chapel honours Anubis, the deity of mummification. The twelve fluted proto-Doric columns support an intact ceiling adorned with golden stars on an azure background. Inside the rock chambers, travellers can view wall registers showing Thutmose III and Hatshepsut making wine offerings to Anubis and Sokar.
Mortuary Temple of Mentuhotep II
Preceding Hatshepsut's complex by over five centuries, this terraced monument was constructed by the pharaoh who reunited Egypt during the Middle Kingdom. The platform once featured tree-lined approaches, pillared porticos, and a core mastaba structure. While partly ruined, the stone foundations reveal the architectural prototype that later shaped the entire Deir el-Bahari valley.
Ramesseum, Medinet Habu & Valley of the Queens
Ramesseum Fallen Colossus of Ramesses II, Mortuary Temple of Merenptah, Temple of Seti I at Qurna, Medinet Habu Mortuary Temple of Ramesses III, Migdol Syrian Gate, Valley of the Queens, and Tomb of Queen Nefertari QV66
Ramesseum
Constructed on the edge of the cultivated land, this grand complex honoured Ramesses II and the state god Amun. Surviving colonnades, mudbrick storehouses and carved relief panels depict famous battles against the Hittites. Visitors can study the vast courtyard layout that influenced centuries of royal Egyptian funerary design.
Fallen Colossus of Ramesses II
Resting within the first court of the Ramesseum, this single block of Aswan red granite originally stood nearly twenty metres tall. Weighing over one thousand tonnes, it fractured in antiquity and inspired Percy Bysshe Shelley's famous poem Ozymandias. The surviving torso, shoulders and partial foot show remarkable ancient masonry skill.
Ramesseum Mudbrick Vaults
Extending behind the stone temple, these extensive mudbrick barrel vaults served as grain stores, workshops and temple archives. They demonstrate advanced New Kingdom engineering using pitched-brick construction techniques. Walking among these preserved corridors offers rare insight into the enormous economic machinery required to support royal mortuary cults.
Medinet Habu
Recognised for its imposing enclosure walls, Medinet Habu remains one of the best-preserved royal monuments on the west bank. Ramesses III decorated the sandstone pylons with deeply carved reliefs to resist erasure, illustrating military campaigns against the Sea Peoples. Colourful ceiling paint still survives beneath the monumental hypostyle hall and inner shrines.
Migdol Syrian Fortress Gate
Serving as the main entrance to Medinet Habu, this unique structure was modelled after Western Asian military watchtowers known as migdols. The upper storeys contained private royal apartments with carved depictions of the pharaoh relaxing with his court. Its sturdy stone battlements reflect Egypt's imperial interactions during the Twentieth Dynasty.
Chapels of the God's Wives of Amun
Located just inside the outer precinct of Medinet Habu, these four small stone chapels belong to royal women who ruled Thebes religiously during the Third Intermediate Period. High priestesses including Shepenupet II and Amenirdis I constructed carved tombs here. The delicate carvings reflect a revival of classic Old and Middle Kingdom artistic styles.
Palace of Ramesses III
Adjoining the southern side of the first courtyard at Medinet Habu, this palace served ceremonial and residential functions during festivals. Stone doorways, pillar bases and bath installations remain visible despite the collapse of the upper mudbrick walls. A decorated balcony of appearances allowed the king to inspect assemblies below.
Mortuary Temple of Merenptah
Pharaoh Merenptah built his mortuary temple largely using stone quarried from the neighbouring complex of Amenhotep III. Excavations here revealed the famous Victory Stele, which contains the earliest known historical reference to Israel. An on-site museum displays restored relief blocks, royal statues and architectural models detailing the temple layout.
Temple of Seti I at Qurna
Situated at the northern edge of the Theban necropolis, this temple was begun by Seti I and completed by his son Ramesses II. Dedicated to Amun and the deified king, the central sanctuary retains finely executed limestone bas-reliefs displaying classic Nineteenth Dynasty draughtsmanship. Its quiet courtyards feature papyrus-bundle columns and delicate ritual scenes.
Valley of the Queens
Known in antiquity as the Place of Beauty, this hidden wadi holds more than ninety tombs belonging to queens, princes and princesses of the New Kingdom. The limestone cliffs contain rock-cut chambers decorated with historic funerary spells and offerings to the underworld gods. It provides essential historical evidence on the lineage of Eighteenth, Nineteenth and Twentieth Dynasty royalty.
Tomb of Queen Nefertari QV66
Discovered in 1904 by Ernesto Schiaparelli, this subterranean tomb is celebrated for having the most historic and refined wall paintings in Egypt. The plaster-covered walls illustrate Nefertari guided by Anubis and Osiris, alongside passages from the Book of the Dead. High-relief modelling and brilliant pigment preservation make it a masterwork of ancient art.
Tomb of Prince Khaemweset QV44
This well-preserved tomb was carved for Prince Khaemweset, who served as a priest of Ptah before his premature death. The colourful wall paintings show Ramesses III introducing his young son to deities of the afterlife, including Thoth, Anubis and Isis. The painted scenes retain exceptional freshness, featuring rich blues, yellows and crisp hieroglyphic inscriptions.
Tomb of Queen Titi QV52
Queen Titi held titles including Royal Daughter, Sister, Wife and Mother during the Twentieth Dynasty. Her cross-shaped tomb contains chambers decorated with rare mythological figures, including guardian demons and winged deities depicted on pale backgrounds. Although damaged over time, surviving murals show Titi offering sistrums to the gods of the underworld.
Tomb of Prince Amun-her-khepeshef QV55
Carved for the eldest son of Ramesses III, this tomb contains lively painted scenes highlighting the prince wearing the traditional braided sidelock of youth. In the burial chamber, an unfinished granite sarcophagus remains, along with a glass case holding an aborted foetus found during excavation. The paintings show touching familial interactions between father and son.
Mortuary Temple of Thutmose III at Qurna
Perched on the lower slopes near the Ramesseum, this site marks the mortuary foundation of Thutmose III, known as Henket-ankh. Extensive excavation work has reconstructed its stone pylons, courtyards and dedicated sanctuaries to Hathor and Amun. Discovered painted relief fragments reveal fine Eighteenth Dynasty craftsmanship produced during Egypt's greatest military expansion.
Temple of Ay and Horemheb
Located just south of Medinet Habu, this complex was initiated by Pharaoh Ay and later usurped and expanded by his successor Horemheb. The stone remains, though heavily quarried in antiquity, retain substantial ground plans, column bases and colossal statue fragments. It documents the political transition marking the end of the Amarna royal line.
Sacred Lake of Medinet Habu
Situated within the northern enclosure of Medinet Habu, this rectangular body of water was fed directly by the underground water table. Priesthood members performed daily purification ceremonies here before entering the sacred shrines of the mortuary temple. The surrounding masonry steps and corner wells illustrate the hydraulic engineering deployed by New Kingdom builders.
Deir el-Shelwit
Standing south of Medinet Habu in solitary desert terrain, this small temple was built under Roman rule during the first century AD. Dedicated to Isis of Thebes, the stone shrine features relief carvings depicting Roman emperors, including Augustus, making offerings to Egyptian gods. Its intact propylon gate and roofed sanctuary demonstrate religious continuity well into late antiquity.
Colossi of Memnon
Guarding the entrance to what was once the largest mortuary complex in western Thebes, these eighteen-metre-high statues depict Amenhotep III seated on his throne. Fractured by an ancient earthquake, the northern figure became famous among Greeks and Romans for producing vocal sounds at sunrise. Ancient graffiti carved by imperial travellers remains clearly visible on their stone bases.
Temple of Amenhotep II
Positioned north of the Ramesseum, this temple precinct honoured Pharaoh Amenhotep II, celebrated for his athletic prowess and military leadership. Thorough archaeological surveys revealed its limestone foundations, ceremonial courts and fragments of fine royal statuary. The site offers valuable architectural evidence showing the evolution of Theban mortuary temples between Hatshepsut and Ramesses II.
Deir el-Medina Artisans’ Village & Tombs of the Nobles
Deir el-Medina Ptolemaic Temple, Tomb of Sennedjem TT1, Tomb of Inherkha TT359, Workmen’s Village Houses, Tombs of the Nobles Sheikh Abd el-Qurna, Tomb of Ramose TT55, Tomb of Nakht TT52, Tomb of Menna TT69, and Assasif Tomb of Pabasa
Deir el-Medina Artisans' Village
This preserved desert village accommodated painters, stonemasons, and sculptors throughout the New Kingdom. Wandering among stone foundation walls, visitors can trace intact street layouts, family living quarters, and domestic cellars. The site yields immense insight into the daily administration, legal disputes, and private lives of ordinary Egyptian working families.
Ptolemaic Temple of Hathor at Deir el-Medina
Dedicated to Hathor and Maat, this remarkably preserved temple dates to the reigns of Ptolemy IV and Ptolemy VI. Its interior chambers showcase detailed reliefs of the judgment of the soul before Osiris alongside ritual temple foundation ceremonies. Coptic monks subsequently inhabited the complex, leaving painted crosses that gave the site its modern Arabic name.
Tomb of Sennedjem (TT1)
Discovered completely unplundered in 1886, this subterranean vaulted chamber belonged to a master artisan serving Seti I and Ramesses II. The historic plaster decorations show Sennedjem and his wife Lyneferti playing senet and harvesting celestial fields in the afterlife. The exceptional preservation of yellow ochre pigments makes it an essential stop in the village necropolis.
Tomb of Inherkha (TT359)
Inherkha served as the foreman of craftsmen during the reigns of Ramesses III and Ramesses IV. His burial vault contains striking depictions rendered against a radiant golden-yellow background, including the Great Cat of Heliopolis slaying the serpent Apophis beneath a persea tree. The technical virtuosity reflects the master draughtsmanship practised by elite royal tomb decorators.
Tomb of Peshedu (TT3)
Peshedu held the title of Servant in the Place of Truth during the early Nineteenth Dynasty. His vaulted burial chamber features the celebrated painting of the deceased kneeling in prayer beside a canal shaded by a leafy dôm palm. Visitors enter through a narrow flight of steps leading down into an intimate, richly painted underground sanctuary.
Great Pit of Deir el-Medina
Originally dug by villagers in an unsuccessful quest to locate fresh water, this fifty-metre-deep depression became the village rubbish dump. Archaeologists recovered thousands of limestone flakes and pottery shards inscribed in hieratic script from the pit. These everyday texts document shopping lists, poetry, doctor visits, and history's first recorded labour strikes.
Tomb of Ramose (TT55)
Ramose served as governor of Thebes under Amenhotep III and Akhenaten, leaving this grand hypostyle hall unfinished. The interior contains sublime low-relief limestone carvings of banquet guests alongside early, experimental sunken reliefs depicting the royal family worshipping the Aten sun disk. This stylistic transition offers a direct window into dramatic religious reforms.
Tomb of Nakht (TT52)
This T-shaped tomb chapel belonged to Nakht, an eighteenth-dynasty astronomer of Amun. Although compact, the plastered walls display dynamic vignettes of winemaking, fowling in papyrus marshes, and a banquet featuring a blind harpist with three female musicians. The naturalistic rendering of animals and plants exemplifies the heights of mid-Eighteenth Dynasty private painting.
Tomb of Menna (TT69)
Menna supervised the cadastral surveys of fields for Pharaoh during the Eighteenth Dynasty. His tomb chapel presents comprehensive sequences of grain harvesting, measuring field boundaries, and recording tribute under the watchful eyes of scribes. Intricately painted depictions of the weighing of the heart before Osiris occupy the inner chamber walls.
Tomb of Rekhmire (TT100)
Rekhmire served as vizier under the warrior pharaoh Thutmose III and his successor Amenhotep II. The long, sloping corridor displays famous narrative registers depicting foreign delegations from Punt, Crete, Nubia, and Syria carrying exotic gifts. Extensive hieroglyphic inscriptions preserve the Installation of the Vizier, detailing ancient Egyptian legal and civic administration.
Tomb of Sennefer (TT96)
Known popular as the Tomb of the Vineyards, this burial belonged to Sennefer, the Mayor of the Southern City under Amenhotep II. The ceiling of the four-pillared burial chamber is carved irregularly and painted to resemble a canopy of ripening purple grapes. Walls illustrate Sennefer receiving purification rites alongside his wife Meryt.
Tomb of Userhet (TT56)
Userhet supervised royal troops and served Amenhotep II during an era of significant imperial expansion. His chapel contains rare portrayals of recruits receiving military haircuts alongside a vivid desert hunt showing gazelles and hares pursued by chariot. Warm pastel tones and fine line draughtsmanship distinguish the plaster compositions from neighbouring monuments.
Tomb of Pabasa (TT279)
Pabasa held the prominent office of Chief Steward to the God's Wife of Amun, Nitocris I, during the Saite Renaissance. His large subterranean complex includes a pillared court adorned with intricate sunken reliefs of daily life, rare beekeeping scenes, and market commerce. The archaizing artistic style self-consciously revives classical Old and Middle Kingdom artistic conventions.
Tomb of Kheruef (TT192)
Kheruef served as steward to Queen Tiye and oversaw monumental building projects during the height of the Eighteenth Dynasty. His tomb contains a massive peristyle courtyard featuring detailed bas-reliefs of the king's Sed jubilee ceremonies, ritual dances, and wrestling matches. These historic scenes provide essential evidence for late Eighteenth Dynasty religious and palace ceremonies.
Tomb of Ankh-hor (TT414)
Ankh-hor held the post of High Steward of the Divine Adoratrice during the Twenty-sixth Dynasty. The tomb complex features a substantial mudbrick pylon leading down into sunken open courts, vaulted corridors, and deep burial shafts. Subsequent re-use across the Ptolemaic era makes it an important centre for studying elite funerary continuity.
Tomb of Shoshenq (TT27)
Constructed for Shoshenq, Chief Steward to the Divine Votaress, this vast subterranean complex reflects the revivalist grandeur typical of Twenty-sixth Dynasty Theban administrators. Its extensive layout features a sunken open-air courtyard carved out of limestone bedrock and bordered by pillared halls. Elaborate mortuary texts from the Book of the Dead dominate the interior walls.
Tomb of Roy (TT255)
Roy served as a royal scribe in the estates of Horemheb and Amun towards the close of the Eighteenth Dynasty. This single-room funerary chapel contains delicate, small-scale paintings depicting funerary processions, agricultural labour, and the psychostasia scene of weighing the heart. Its clean proportions offer an accessible look at late New Kingdom scribal burials.
Tomb of Shuroy (TT13)
Located in Dra Abu el-Naga, this burial belonged to Shuroy, an official responsible for carrying incense braziers during rituals for Amun. The entrance hall contains narrative wall murals showing mourning relatives following a funerary barque to the tomb. Restorations have illuminated the broad palette of mineral pigments favoured during the Ramesside period.
Tomb of Benia (TT343)
Benia, also known by the Egyptian name Pahekmen, was an official of foreign descent who oversaw royal works under Thutmose III. His rock-cut chapel features rock-cut statues of the deceased flanked by his parents at the rear niche. Wall scenes depict offerings, banquet musicians, and the formal inspection of tribute.
Sheikh Abd el-Qurna Hilltop Viewpoint
Rising above the plain of Western Thebes, this rocky hill is riddled with hundreds of non-royal tombs belonging to New Kingdom courtiers. From its upper paths, travellers look out across the mudbrick pylons of the Ramesseum, the temple of Medinet Habu, and the lush green Nile flood plain. It provides an exceptional geographical vantage point over three millennia of burial architecture.
Ferry Crossings and Early-Morning Necropolis Visits in Luxor
Before setting out, check local transit connections, museum booking notes and monthly weather data in our Luxor city guide, and compare other walking itineraries.